How-to — 6 min read
Small business trends to watch in 2026
The start of the year is always a vital time for small businesses. It brings opportunities to fine-tune your strategy,…

Here at Setmore we operate with a very simple formula. The more ways your customers have to book their appointments online, the more appointments you’ll likely get overall. And, the less time you’ll spend on the phone, helping customers book their appointments.
To summarize:
More ways to book online = More appointments, Less time on the phone
If you’re new to Setmore or online booking, it’s much simpler than it looks from the outside. Setmore gives you the tools to establish your online presence and open the digital front door that customers will use to engage with your business. Here’s a list of the apps we’ll be using. You don’t have to use them all, but the more you use, the more powerful your combined online software solution will be. Scroll down for an in-depth breakdown of each app’s role and how to use it.
This is where the rubber meets the road. The Booking Page comes free with your Setmore account. It lists your staff, services, availability, and contact info. Customers book their appointments here, and their appointments show up on your Setmore calendar. Your primary goal is to get customers to your Booking Page.
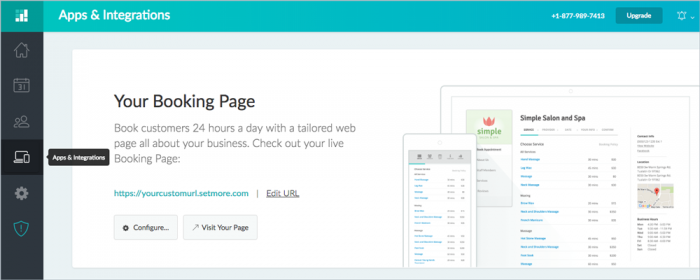
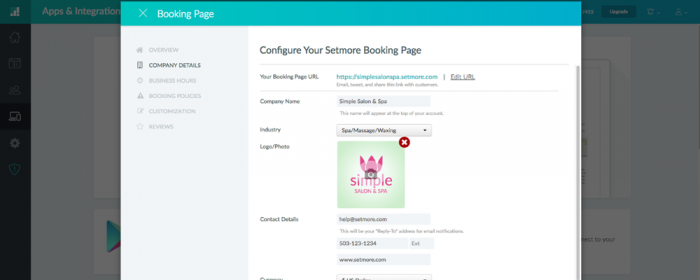
First, let’s add some key information to your Booking Page. Go to Apps & Integrations, then look under the section titled “Your Booking Page.” Here you can access or edit your Booking Page URL, visit your page, or configure the back-end options by clicking the “Configure…” button.
The important thing to remember when setting up your Booking Page is to make it welcoming and inviting. Do this by providing verbal descriptions for each of your staff members and the services they provide. It’s also important to upload a thumbnail avatar for each staff and service.
Learn how to set up your Booking Page for success. Watch a how-to video >
All the information you fill in through your Setmore interface will show up on your Booking Page. When you’re all finished, be sure to check it out by going to Apps & Integrations, and under where it says “Your Booking Page,” click “Visit Your Page.” More information means your customers can make a better informed decision about what services to book, which means a better experience overall.
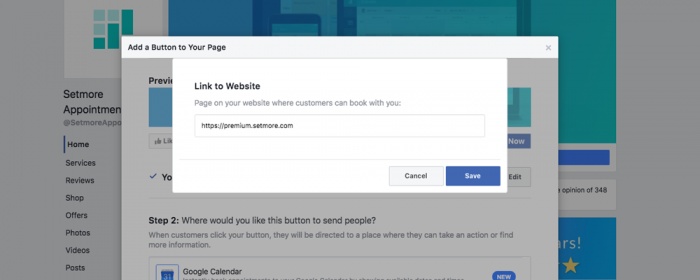
Dang nearly everyone on the planet is on Facebook. A lot of your potential customers will be sourcing recommendations from their friends on here. So it’s important to maintain a business profile to serve as a “landing zone.”
Using Facebook’s “Add a Button” feature, you can create a call-to-action button that will link directly to your Setmore Booking Page. This button will appear to your followers and fans who are browsing Facebook from a laptop, or from their phones.
More of a visual learner? Click here to watch the Facebook button how-to video >
The “Book Now” button will appear on your Facebook business page. Click it, and then select “test button” to verify that the button works.
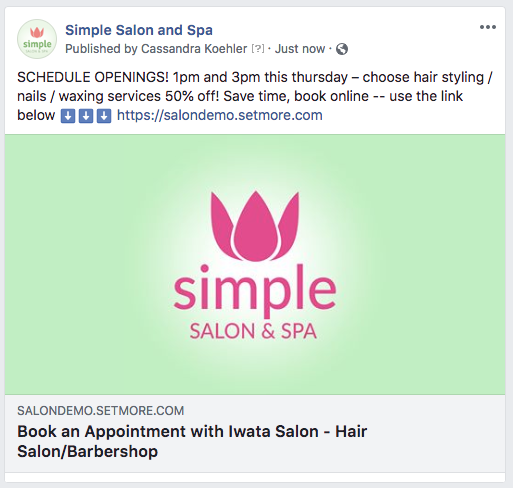
Adding the button is only half the battle. When using Facebook to promote your services, you should be making regular posts that encourage users to schedule an appointment online. And you should link these posts to your Setmore Booking Page.
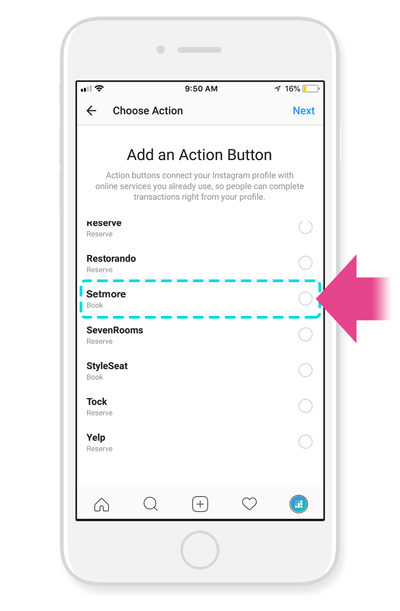
Instagram is great for posting photos of your work. Recent updates to the platform now allow customers to book appointments directly through the Instagram app.
Instagram doesn’t offer exposure to as many customers as Facebook. But the key advantage is being able to use photos of your work to build interest in your services. Customers can see your awesome pics, and then act on their interest to book your services online. They can do this in just a few taps, without leaving the Instagram app.
Or, follow along with a how-to video. Watch step-by-step instructions via Instagram >
The “Book” button will appear on your Instagram profile. When customers tap this button, your Booking Page will open inside the Instagram app, giving them a direct path to book online.
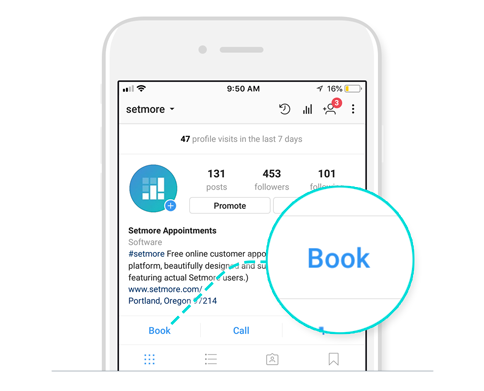
Like with Facebook, this button becomes more effective the more you promote your services! Post your availability along with a message such as “Tap the Book button in our profile.” And do it regularly to remind your customers that they have this option.
Despite all claims to the contrary, email marketing is still very much alive and worthwhile. And, publishing a monthly newsletter with coupons or promotions is a great way to build your base of returning customers. Setmore gives you a way to automatically export new customer contacts to your newsletter recipient list.
This saves you the time involved in manually exporting/importing customer contact information from Setmore to MailChimp. But the real benefit here is when you include a link to your Booking Page in your email newsletters. This makes it even easier for customers to book an appointment online. Or, better yet, if you’re promoting a deal or sale in your newsletter, this lets customers act on their interest right away.
MailChimp is our email marketing app of choice. And it’s the one we’ll be discussing here. But Setmore also offers an integration with Constant Contact.
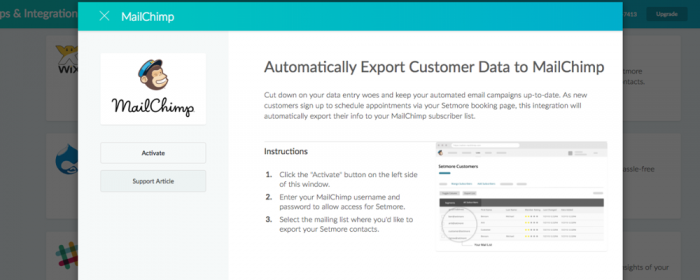
Now whenever you add new customers to your Setmore account, they’ll automatically be exported to your MailChimp email marketing list. Customers may also add themselves simply by booking an appointment through your Booking Page. This also works if customers book from your Facebook or Instagram integrations, mentioned above.
With all of these apps and platforms working for your business, your customer journey looks something like this:
Much of this process is automated, which means that you’re freed up to focus on more important things. Like running your business, or delivering a high-quality service, or thinking up new ways to expand your services and reach new customers.
Most of the apps and services we covered here are free to use, with paid options to access advanced features. But you could set up everything as described and only pay $1 USD. So what are you waiting for – Get started today!

by Cassandra
Writer, editor and scheduling product expert at Setmore Appointments.


The start of the year is always a vital time for small businesses. It brings opportunities to fine-tune your strategy,…

Many small service-based businesses start with one goal: to help people. But over time, the behind-the-scenes demands start to stack…
Business owners, this one’s for you. Ever thought, “I need something that works with my existing tools, saves me time,…
